Create a Poll with PHPixie

To illustrate the basics of developing with PHPixie we will create a small polling application. By the end of this tutorial you will have a working poll application and an understanding of how easy it is to code projects using PHPixie.
Before going on, make sure you download PHPixie from the project’s website and extract the downloaded archive into the root web directory of your web server. Visit http://localhost/ (or other address as appropriate) in your browser and you should see the ‘Have fun coding!’ welcome message.
Creating the Database
First we’ll need to create two tables in the database:polls will store the topic we would like to get opinions for, and options will contain possible answers for each poll and the amount of votes each received.Open up your MySQL client and run these queries:
CREATE TABLE polls (
    id INTEGER UNSIGNED NOT NULL AUTO_INCREMENT,
    topic VARCHAR(255) NOT NULL,
    PRIMARY KEY (id)
);

CREATE TABLE options (
    id INTEGER NOT NULL AUTO_INCREMENT,
    name VARCHAR(255) DEFAULT NULL,
    poll_id INTEGER UNSIGNED NOT NULL,
    votes INTEGER NOT NULL DEFAULT 0,
    PRIMARY KEY (id),
    FOREIGN KEY (poll_id) REFERENCES polls(id)
);database.php file inside the application/config directory:<?php
return array(
'default' => array(
'user' => 'dbuser',
'password' => 'dbpassword',
'driver' => 'pdo',
// 'Connection' is required if we use the PDO driver
'connection' => 'mysql:host=localhost;dbname=polls',
// 'db' and 'host' are required if we use Mysql driver
'db' => 'polls',
'host' => 'localhost'
)
);Models
A common way to describe the Model-View-Controller architecture is as follows:- Models represent data objects we work with (polls and options in our case)
- Controllers handle user requests and are the heart of our application
- Views are templates that controllers use to display the response
<?php
class Poll_Model extends ORM {
    // Each poll can have many options
    public $has_many = array('options');

    // This way we can define some additional
    // dynamic properties for a model.
    // Later on we will be able to access it via $poll->total_votes
    public function get($property) {
        if ($property == 'total_votes') {
            $total = 0;
            foreach ($this->options->find_all() as $option) {
                $total += $option->votes;
            }
            return $total;
        }
    }
}application/classes/model/poll.php.Relationships may be defined using 3 arrays:
belongs_to, has_one, and has_many. The first (belongs_to) defines a one-to-one relationship when a table references another table using a foreign key, in our case options belongs to polls using the poll_id
field. The foreign key is automatically guessed using model names by
PHPixie. On the other side of the belongs to relationship falls has_many, in our case each poll has many options. has_one is a special case of has_many,
limiting the amount of referenced objects to one. To define a
relationship, we just need to add the name of the model we want to the
appropriate array. A more thorough relationship configuration is
possible, with the ability to specify which field to use for the
relationship, set a different name for it, or to create a many-to-many
relationship via a linking table, but in our case using this simple
approach is enough.The
find_all() method looks up records in the database. When we reference the options property, ORM is silently building a database query to select all of the options for the current poll. Calling find_all() subsequently executes that query and returns these options also as ORM models. Overriding the
get() method
allows us to add properties to our model dynamically. If a property we
are trying to access is not found in the model class, ORM will call the
class’ get() method passing the name of the property as an argument. Any result that get()
will return will be considered the value for that property and stored
inside the model, so that when we access the property once more we will
get the cached value. As internal model operations usually invoke some
kind of database action, it is preferable to have data cached, so that’s
why we’re overriding get().Note that while
get() is often used to cache data from find_all(), it is not meant only for that. For example, we could use get() to define a property that we would access multiple times but should only be retrieved once.This internal cache persists only for the current object. Of course if you don’t want this behavior at all it is always possible to add your own
total_votes() method to the model that will recalculate the votes each time it is called.The code for the options model is placed in
application/classes/model/option.php: <?php
class Option_Model extends ORM {
public $belongs_to = array('poll');
public function get($property) {
if ($property == 'percent') {
if ($this->poll->total_votes == 0) {
return 0;
}
return floor($this->votes / $this->poll->total_votes * 100);
}
}
}belongs_to relationship with polls and a percent property, the only difference being that for one-to-one relationships it is not necessary to call the find_all() method, so we can access the poll that this option belongs to just as if it was a property.PHPixie relies heavily on naming conventions to save us time when creating models, although it doesn’t force us to name everything according to these conventions (it’s easy to alter this behavior). Here we’re following the convention of using the plural form when naming tables in the database and singular form when naming models.
Basic Controller
The URL for a specific action by default is/// e.g. http://localhost/polls/add. It is also possible to pass an extra ID parameter after the action which we will use to access individual polls.Our controller will have to know how to display three types of pages:
- Main page with all the polls listed
- A single poll page where we can see current results and cast a vote
- A form to add a new poll
<?php
class Polls_Controller extends Controller
{
    public function action_index() {
        // This is how we load up a template
        $view = View::get('index');
        $this->response->body = $view->render();
    }

    public function action_poll() {
        $view = View::get('poll');
        $this->response->body = $view->render();
    }

    public function action_add() {
        $view = View::get('add');
        $this->response->body = $view->render();
    }
}before() and after()
methods defined inside the controller and they will execute
respectively before and after an action is called. Now our controller
will look like this (save the following as application/classes/controller/polls.php):<?php
class Polls_Controller extends Controller
{
protected $view;
public function before() {
// We load up the main view and
$this->view = View::get('main');
// Now we find a full path to a view that has
// the same names as the action to be excuted
$template = Misc::find_file('views', $this->request->param('action'));
// We pass the view we located to our main template.
// All properties assigned to a view will be available
// as variables inside the template
$this->view->template = $template;
}
public function after() {
// After an action completes we render the view
$this->response->body = $this->view->render();
}
public function action_index(){
$view = View::get('index');
$this->response->body = $view->render();
}
public function action_poll() {
$view = View::get('poll');
$this->response->body = $view->render();
}
public function action_add() {
$view = View::get('add');
$this->response->body = $view->render();
}
}HTML Layouts Using Views
Views are basically HTML files with inserted PHP code to display the values assigned to place-holder variables from inside the controller. Our main view is quite small as all it has to do is present some common HTML and include a correct subtemplate. The following isapplication/views/main.php:<!DOCTYPE html>
<html>
<head>
<title>PHPixie polls</title>
<link href="https://netdna.bootstrapcdn.com/twitter-bootstrap/2.2.2/css/bootstrap-combined.min.css" rel="stylesheet">
<link href="/style.css" rel="stylesheet">
<script src="https://ajax.googleapis.com/ajax/libs/jquery/1.9.0/jquery.min.js"></script>
</head>
<body>
<div class="container">
<div class="span4"></div>
<div class="span4">
<h2>PHPixie Polls</h2>
<!-- Here is where we include a subtemplate -->
<?php include($template);?>
</div>
<div class="span4"></div>
</div>
</body>
</html>web/style.css file..nav .muted {
float: right;
}
td form {
margin-bottom: 0px;
}
.filled {
background: #08C;
height: 20px;
}
.bar {
width: 100px;
}Creating Individual Pages
The polls page should just present a list of available polls. It only requires a slight modification tocontroller/polls.php.<?php
//...
public function action_index() {
// We pass all stored polls to the view
$this->view->polls = ORM::factory('poll')->find_all();
}views/index.php:<ul class="nav nav-tabs nav-stacked">
<?php
foreach($polls as $poll) {
?>
<li>
<!-- This is how a link to a single poll will look like -->
<a href="/polls/poll/<?=$poll->id;?>"><?=$poll->topic;?>
<div class="muted"><?=$poll->total_votes; ?> Votes</div>
</a>
</li>
<?php
}
?>
</ul>
<a class="btn btn-block" href="/polls/add"><i class="icon-plus"></i> Add a Poll</a>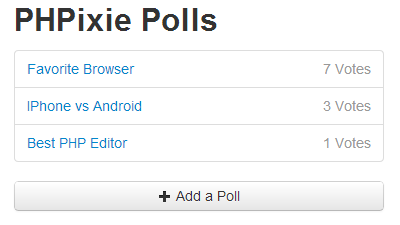
Creating polls requires a bit more work. We have to check if the form was submitted, if so we save a poll and redirect the user back to the listing, otherwise we display the form. Add the following update to
controller/polls.php:<?php
//...
public function action_add() {
// We only need to perform this if the form was submitted
if ($this->request->method == 'POST') {
// Creating a new poll
$poll = ORM::factory('poll');
// This is how you access POST form data
$poll->topic = $this->request->post('topic');
// Save the poll to the database
$poll->save();
// Similarly we create and save options specified for this poll
foreach($this->request->post('options') as $name) {
if (empty($name)) {
continue;
}
$option = ORM::factory('option');
$option->name = $name;
$option->save();
// We add each option to the 'options' relation we defined for the poll
$poll->add('options', $option);
}
// This will prevent after() from executing
// we need to do this because there is no point of returning any data
// if we redirect the user
$this->execute=false;
$this->response->redirect('/polls/');
return;
}
// If the form was not submitted the after() method will
// take care of showing the creation form
}views/add.php:<script>
$(function() {
$('#addOption').click(function(evt) {
evt.preventDefault();
var newOption = $('.option:eq(0)').clone();
newOption.find('input').val('').attr('placeholder', 'Option #'+($('.option').length + 1));
$('#options').append(newOption);
})
})
</script>
<form method="POST">
<fieldset>
<legend>Add a new poll</legend>
<label>Topic</label>
<input type="text" placeholder="Type your topic here..." name="topic">
<label>Options</label>
<div id="options">
<div class="option">
<input type="text" name="options[]" placeholder="Option #1">
</div>
<div class="option">
<input type="text" name="options[]" placeholder="Option #2">
</div>
<div class="option">
<input type="text" name="options[]" placeholder="Option #3">
</div>
</div>
<button class="btn" id="addOption"><i class="icon-plus"></i> Add option</button>
<button class="btn btn-primary"><i class="icon-ok icon-white"></i> Save poll</button>
</fieldset>
</form>
<a class="btn btn-link" href="/polls">< Back to polls</a>options[],
this way it will be passed as array of options to PHP. We also added a
convenient Add Option button to add additional rows. The result should
look as follows: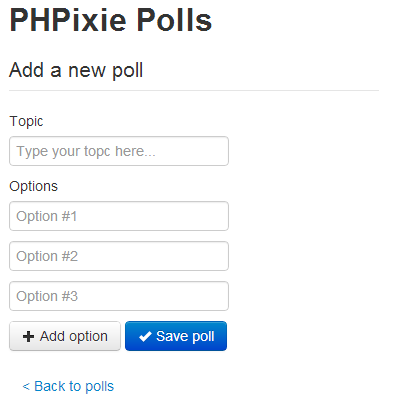
I hope at this point you can already predict some of the code you will see here. This controller has to fetch the poll specified by the ID in the URL, and it should also handle users voting for an option. Again, make the following updates to
controller/polls.php:<?php
//...
public function action_poll() {
// Handle voting
if ($this->request->method == 'POST') {
// If an option is was supplied via POST we increment
// its votes field by 1
$option_id = $this->request->post('option');
$option = ORM::factory('option')->where('id', $option_id)->find();
$option->votes += 1;
$option->save();
// Now we redirect the user back to current polls' page
// This is done so that refreshing a browser window will not
// produce multiple votes
$this->response->redirect('/polls/poll/' . $option->poll->id);
$this->execute = false;
return;
}
// You can get the url id parameter using param()
$id = $this->request->param('id');
$this->view->poll = ORM::factory('poll')->where('id', $id)->find();
}find() method acts just like find_all()
but it returns only the first result. Inside the view we want to draw
bars that would depict the relative amount of votes, and this is why we
added that percent property to the options model earlier. The following
code is for views/poll.php:<h3><?=$poll->topic;?></h3>
<table class="table">
<?php
foreach ($poll->options->find_all() as $option) {
?>
<tr>
<td><?=$option->name;?></td>
<td><?=$option->votes;?></td>
<td class="bar">
<div class="filled" style="width:{{{PHP5}}}%;"></div>
</td>
<td>
<form method="POST">
<input type="hidden" name="option" value="<?=$option->id;?>">
<button class="btn btn-mini">Vote</button>
</form>
</td>
</tr>
<?php
}
?>
</table>
<a class="btn btn-link" href="/polls">< Back to polls</a>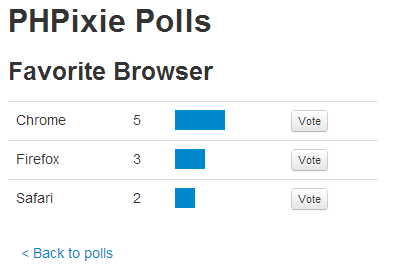
Almost Done
Before we declare our application complete we still need to make sure it is available by visiting http://localhost/. To do this, we have to change the default controller in theapplication/config/core.php configuration file from ‘home’ to ‘polls’ like this:<?php
return array(
'routes' => array(
array('default', '(/<controller>(/<action>(/<id>)))', array(
'controller' => 'polls',
'action' => 'index'
)
)
),
'modules' => array('database', 'orm')
);There is still a lot to learn though. Things like custom routes and complex ORM relationship can help you tailor your project even more. Learn more about them by visiting the PHPixie website.